I am going to retire this blog. I just don't have time to maintain this one along with my other two. The The Raw Files will be carrying a lot more behind the scenes work and tutorials now so I see no point in carrying on with this one.
The Raw Files
Sunday, March 22, 2009
Tuesday, March 10, 2009
Extending a Background (Mac)
I thought I'd throw up a quick little tip for those that are interested in such things. The photo below is an image I shot on the weekend and is straight out of the camera. 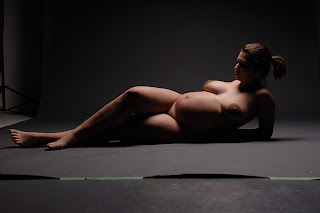 You will notice that there are background elements that are not overly attractive. It is amazing how fast a 9' wide piece of paper runs out when you have a model lying down. When I am shooting I simply make sure that I have the paper background all around her body parts and then it is a snap to extend the paper in Photoshop. I was cutting it a little close by her left toe but it is enough to work with. Here's how it's done:
Simply select the rectangular marquee tool and make a selection of good paper just above where the paper ends as shown below.
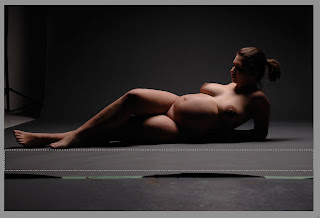
Copy that selection to a new layer and select the 'free transform' command and simply drag the middle selection node straight down as shown in the photo below. Merge this patched layer down and you can quickly clean up any spots and whatnot with the healing brush. That's it. I did the same thing with the left side.
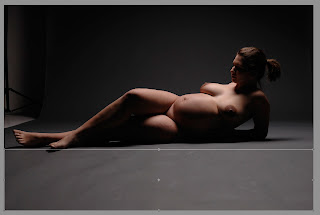
If you have been struggling to do such 'fixes' with a clone stamp or the likes I think you will find this a much better alternative. This technique can also be used for various retouching conundrums - just another trick in your bag :-)
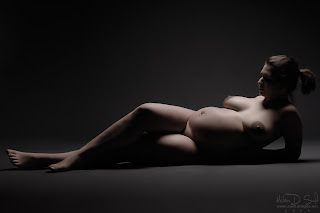
This was lit with a single medium softbox on a boom over head. Here is the final version given to the model:
 You will notice that there are background elements that are not overly attractive. It is amazing how fast a 9' wide piece of paper runs out when you have a model lying down. When I am shooting I simply make sure that I have the paper background all around her body parts and then it is a snap to extend the paper in Photoshop. I was cutting it a little close by her left toe but it is enough to work with. Here's how it's done:
Simply select the rectangular marquee tool and make a selection of good paper just above where the paper ends as shown below.

Copy that selection to a new layer and select the 'free transform' command and simply drag the middle selection node straight down as shown in the photo below. Merge this patched layer down and you can quickly clean up any spots and whatnot with the healing brush. That's it. I did the same thing with the left side.

If you have been struggling to do such 'fixes' with a clone stamp or the likes I think you will find this a much better alternative. This technique can also be used for various retouching conundrums - just another trick in your bag :-)
This was lit with a single medium softbox on a boom over head. Here is the final version given to the model:

Subscribe to:
Comments (Atom)